HOW TO Clean your Oven, Quick & Easy

Baking sodaOnce in a while, things cook over; it happens to the best of us!  There is the immediate problem of needing to continue the baking process for what’s still in the pan, and that fact will also force you to burn the spillage.  So I have two solutions, one for each phase:

1) When the spillage has happened, and you don’t want to fill the house with that burnt smell, just pull out the baking goods temporarily, sprinkle cinnamon onto the spillage, and then return the dish to continue baking.  The house will smell like warm cinnamon.

2)  Next, when the deed is done, and the oven has cooled down, take some baking soda and sprinkle onto the burnt debris; if it’s drizzled down the sides of the oven, just damp them with a bit of water and then rub some baking soda onto them with the damp towel.  For the floor-spillage, squeeze a bit of water onto the baking soda, then close the door and let it work for a few minutes; usually 10 minutes is enough, and you’ll learn by practice how long you need for your sized messes!  Take a non-abrasive sponge or a kitchen wash cloth, and wipe it down.  You may need to repeat it once or twice more, but it saves back-breaking scrubbing, and won’t damage your oven.

The baking powder works amazingly fast, and it’s a natural product; no fumes, no chemicals!
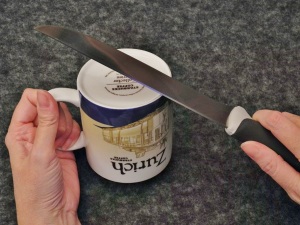
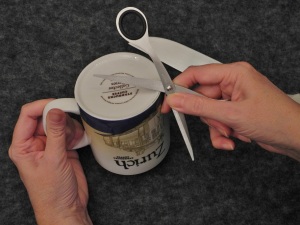
HOW TO Sharpen Knives and Scissors with a Mug

This is a trick I’ve been doing for years; I have a proper honing steel, but a mug works just as well for most common knives and household scissors that need a quick perk.

HOW TO Sharpen Knives HOW TO Sharpen ScissorsTake any mug that has a rough ceramic rim around the base; in the illustrations I’ve used a local coffee mug.  In a similar technique as using a honing steel, except that you’ll run the knife on a single surface rather than alternating sides (see video here to understand what I mean).  As he points out in the video, make sure you run the knife or scissor blade from the base to the tip, to get even sharpening the entire length of the blade.

Always keep your fingers away from the sharpening surface!  Apply just a bit of pressure to get the best effect; a bit of practice will teach better than I can explain it.  It usually only takes me 10-15 passes of each blade to get a pair of scissors back in top form, and the same with a knife.


Strawberry Tiramisu

This is a variation on my Apple Tiramisu that I shared with you quite some time ago; as with the original, there are no raw eggs in this delicious dessert.  I made this version this summer when strawberries were at their peak, and it is now a variation I will gladly repeat!  It is delicious, light, and great for outdoor grill parties, or more elegant dinner parties.  To serve neat slices, you may want to partially freeze this just before serving; otherwise, thoroughly chilled will do just as well.

Strawberries, Strawberry LiqueurStrawberry Tiramisu

750 gr. strawberries – washed, quartered (26.5 oz.)
1 Tbs. vanilla sugar
½ lemon’s juice
a dash of Amaretto or almond extract

Stir together carefully, as not to bruise the strawberries.  If you want them a bit more juicy, put a handful into a blender and purée.

500 gr. mascarpone (18 oz.)
5 dl. whipped cream (just over 2 Cups)
2 Tbs. strawberry liqueur (optional)

Beat until foamy.

3 pkgs. Lady Finger cookies (18 per 2 layers = 36)

Taking a large-ish casserole dish, layer in twice in the following order: Sauce, biscuits, whipped topping.

Strawberry TiramisuStick toothpicks around the edge and down the centre and cover with plastic wrap (the toothpicks protect the surface of the dessert for presentation), and chill until ready to serve.

En Guete!