Swiss Apple Tiramisu

I posted this originally in 2012, and wanted to share it with those new to the blog!  I’ll be making this tonight as a dessert to Swiss cheese fondue; despite the cream layer, it will make a light and refreshing contrast to the heavier main meal.  Over a decade ago, I got this recipe from a Swiss friend; I’ve made it dozens of times, and it always gets rave reviews and requests for the recipe!  Unlike other tiramisu, this has no raw eggs, or coffee.


lady finger cookies

Lady Fingers Cookies

Swiss Apple Tiramisu


750 gr. apples

Peel them, chop into large chunks, and blitz them with a chopper (or knife if you’re a purist) into a coarse apple puree.  Add:

1 Tbs. vanilla sugar

½ lemon’s juice

1 C. apple juice

a dash of Amaretto or almond extract

Mix it all together into an apple sauce.  Next, in a separate bowl, mix the cream layer:

500 gr. mascarpone

5 dl. whipped cream

2 Tbs. apple schnapps (Calvados)

Beat til foamy.  You’ll also need:

3 pkgs. Lady Finger cookies (approx. 18 per 2 layers = 36)

In a casserole dish, layer as follows: A bit of applesauce, then rows of biscuits, and whipped topping; repeat once more.

Make this at least an hour before serving, and chill it until time to serve.  I stab toothpicks around the edge and a few down the centre to keep the plastic foil from touching a nicely-smoothed surface.

Swiss Mailänderli Cookies (Mailaenderli)

These cookies (pronounced ” ‘my-land-er-lee”) are one of the traditional Swiss Christmas cookies (along with Spitzbuben and Zitronmöndli), and are very similar to English and American sugar cookies, though they are less crumbly than the latter’s.

Mailänderli - Credit, Tagesanzeiger Newspaper

Mailänderli.  Image Credit: Tagesanzeiger, Swiss Newspaper

Swiss Mailaenderli

250 gr. whipped butter (9 oz.)
250 gr. Sugar (9 oz.)
3 eggs
3–4 Tbs. milk
1 pinch of salt
1 grated lemon peel
500 gr. Flour (18 oz.)

Mix together until smooth.
Roll dough to 3–4 mm thickness, cut out shapes with a cookie cutter.
Paint with the egg yolk. *
Before baking, place in a cool place for ~ 30 minutes–1 hour.**
Bake @ 200 °C for 10 minutes, bottom rack.

*They are brushed with egg yolk before baking to give them the typical golden top, and are usually served plain, without icing, though if you want to top them with icing, add a drop or two of milk or water to powdered sugar to make a fairly stiff icing, and spread a dab on the top of each with a spoon.

**This is traditionally recommended, to help them keep their shapes better. If you don’t have the time, you can chill them ~10 minutes, or just bake straight away, though they tend to spread more if they go in the oven warm.

En Guete!

Swiss Zitronenmöndli (Little Lemon Moon) Cookies

Merry Christmas, everyone!

The Swiss Zitronenmöndli is one of the traditional Christmas cookies here (along with Spitzbuben and Mailänderli).  In High German they are called “Zitronenmöndchen” ; both the -li and -chen are diminutive forms for nouns in the two different dialects (at least in the dialect used around here, in the Zürich area).  These cookies, as their name suggests, are usually cut into the shapes of moons, and glazed with a simple lemon glaze; the finely-ground almonds replace the need for flour.  Sometimes you’ll see them decorated with chopped pistachio nuts, though that is a more modern addition to the traditional recipe; you could also sprinkle lightly-roasted almond slivers over the glaze.

Left to right: Mailänderli; Zitronenmöndli; Spitzbuben

Left to right: Mailänderli; Zitronenmöndli; Spitzbuben

Swiss Zitronenmöndli

350 gr. ground almonds (12 oz.)
200 gr. Sugar (7 oz.)
1 pinch salt
2–3 lemons, peeling grated
1½ fresh egg whites, lightly beaten

Stir all together gradually & thoroughly. On a bit of powdered sugar, roll the dough out to 7 mm thick (¼”). Cut out various sized moons, spread out onto a baking papered tray. Let sit 5–6 hours or overnight at room temperature, to dry out [This step is traditional, but unnecessary in my experience; if the dough is stiff enough to cut neatly, it should hold its shape in the oven fairly well].

Bake in the middle of a 325°F preheated oven, 8–10 minutes. To decorate, brush still–warm cookies with the lemon glaze, then sprinkle a bit of the grated lemon peeling over the top of the glaze while still moist.

Lemon Glaze:

~2 tsp. Lemon juice
150 gr. Powdered sugar (5 oz.)

Stir together until the glaze reaches a thick consistency. Go easy on the liquid, or you’ll need a ton of sugar to get the right consistency!

Swiss Spitzbuben Cookies

Here in Switzerland, if you only bake one cookie around Christmas, this is likely to be the one!  Its name – Spitzbuben – roughly translated, means “Cheeky Boy”, and is taken from the word that originated in the 16th century meaning “trickster” or “con-man”.

My husband and I had a baking time together today, and this is one of three traditional cookies we made; I’ll share the others with you over the next two weeks.

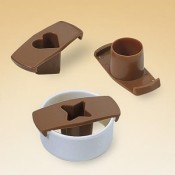
Spitzbuben cuttersSpitzbuben dough needs to be rolled out fairly thin, because the final product will be double-layered; we rolled it out to 3mm.  Half of the cookies are then cut out whole, and half are cut out with a hole in the centre – a “window” to see the filling through.  There are special cutters for this procedure here, but you can simply use a larger and a smaller cutter, well-centred, if you don’t have such cutters available or on-hand.

Spitzbuben

250 gr. butter (9 oz)Spitzbuben
125 gr. sugar or powdered sugar (5 oz.)
2 tsp. vanilla sugar, or vanilla extract
1 pinch of salt
1 egg white
350 gr. flour (12 oz.)

FILLING

~ 200 gr. Clear jelly or jam (7 oz.)

Whip the butter until smooth, then add the sugar, vanilla & salt, & whip until the mixture is light. Beat the egg, & add to the mixture, & then slowly add the flour while stirring, until the mixture is light & smooth. Cover, & chill 1 hour.  About 10 minutes before rolling, remove from fridge. On a lightly-floured surface, roll dough flat (3 mm).  Cut with forms of Ø 4–5 cm. Half of the cookies should have a design cut out of their centres (for the top half of the cookies). Lay the cookies on a papered–tray. Bake @ 200°C ~ 6 – 8 minutes, cool for 15 minutes. (They should be fairly pale; it doesn’t take much for them to become too dark, as this dough doesn’t tend to go “golden brown”.)

The dough will rise slightly; turn the bottom halves over once they’re cooled, and they have created natural little “bowls ” to hold the jelly!  Spread a bit of the jelly (make sure it’s clear, without chunks of fruit in it) on the bottom half (~1 tsp.), and set aside.  When the top halves are ready, dust them with powdered sugar, and then place one top on each prepared base.

Serve with a glass of cold milk!

En Guete!


Swiss Wild Mushroom Fondue

Here in Switzerland, winter is cheese season – Raclette and cheese fondue are the most popular dishes; I stress “cheese” fondue (also known as Fondue Neuchateloise), because there are other varieties that have nothing to do with cheese, such as Fondue Bourguignonne (chunks of meat), Fondue Chinoise (thin slices of beef or pork cooked in bouillon), or Fondue Bacchus (thin slices of pork, veal or seafood cooked in white wine).  The earliest known recipe for modern cheese fondue comes from my neck of the woods, Zürich, Switzerland, in the year 1699, and we Swiss are wise enough to know that if it works, don’t change it!


This is the set we have.

This is the set we have.

Swiss Cheese Fondue

* You will need a fondue crock set.
Calculate 200 – 300 gr. cheese per person (see note below)

1 fresh clove garlic, whole

Kirsch

White Wine

cornstarch (start off with 1/2 Tbs. & increase as necessary)

A handful of mushrooms (see below)

Mouth-sized chunks of bread of your choice (we usually prefer a “brown” bread)

A variety of pickles (baby corn cobs, cucumbers, onions, garlic, etc.) as condiments

Chilled white wine, or hot tea as beverage (see warning below!)


  • Typical fondue cheeses are Gruyère, Appenzeller Rezent, or Tilsiter; if you can’t find those, you can substitute hard, sharp–tasting cheeses. Chop them into chunks, then throw them in the crock & melt it on the stove. [If you use gorgonzola, I would use ¼ to ½ gorgi, & ½ to ¾ harder cheeses.]

Take the crock, & rub the insides with either freshly sliced garlic, or a garlic paste; then chop the garlic, & add it to the cheese after it’s melted.

Once the cheese has begun to melt & is stirrable, pour in kirsch, & white wine (not too much, but enough to thin the cheese down).

You’ll need some kind of a sauce binder like cornstarch (that thickens sauces, neutral tasting); stir it in to the cheese well (I first mix a bit into kirsch, to dissolve it well).

At this stage you can add the garlic and mushrooms.

Morel (left), Porcini (right)

Morel (left), Porcini (right)

  • If the mushrooms you’re using are the dried varieties, soften in warm water and then slice into mouth-sized bites.  I use a combination of morel (Morchel) and porcini (Steinpilz) (I’ve put links to Wikipedia articles in case you are unfamiliar with the English or German names). Try to use aromatic mushrooms, and avoid using the bland button mushrooms!

While the cheese is still melting, prepare the rest of the ingredients (pickles, bread chunks, etc.); get it all ready to go, because once the cheese is on the table burner the meal is hectic for the first few minutes, trying to keep the cheese from burning on the bottom (by stirring a chunk of bread in it) and pouring the wine, etc.

I serve fondue with chunks of bread to dip, + side dishes of all kinds of mixed pickles, & chilled white wine.
We also serve one glass / bowl of kirsch, to dip the bread in prior to stirring in the cheese–it adds a nice bite to the bread.

  • If you don’t want alcohol, I would still recommend cooking wine in the stove stage; you can serve it with hot black tea. If you serve it with cold non–alcoholic beverages, the cheese tends to clump in the stomach, & can be uncomfortable!

En Guete!

Swiss Christmas “Samichlaus” Gift Bags


Swiss Samichlaus & Schmutzli

A Swiss Santa Claus and Schmutzli, in traditional costume.

Here in Switzerland, Santa has come and gone!  In Zürich alone, the Swiss Santas (“Samichlaus”) will make roughly 1,000 visits this year; within a few days around 6 December each year, just over 30 Santas, 50 Schmutzli and 50 drivers are underway.  Now I’m fairly certain most of my readers are familiar with Santa; but here in Switzerland, his helper is called Schmutzli.  Parents throughout the land book Samichlaus and his assistant, “Schmutzli”, and fill in a form for their children:  Names, ages, their favourite subject in school, and the most important questions:  What have the children improved in since the last visit by Samichlaus, and where do they need to improve?  Making their bed, cleaning their room, being nice to their siblings, or sharing more often?  The Samichlaus und his assistants (often two Schmutzli, who are the “coal” bearers, and often have blackened faces, and carry large baskets with some coal, a besom broom, and room for gifts given back to them by grateful parents!) go to the home at the appointed time, and sit down to speak with each child, reading from a great book they carry with them.  Each child is then given a “Samichlaus” bag, and perhaps a gift sponsored by the parents.

Thomas Fetz, local Schmutzli. Image Credit: Migrosmagazin

Thomas Fetz, local Schmutzli. Image Credit: Migrosmagazin

Since 6 December is the official Samichlaus Day, it is customary on that day to give “Samichlaussäckli” (Santa Claus Bags) to friends, family, neighbours and coworkers.  They are great winter gifts to take when visiting friends, and so I thought I would share it here with you, to spread Christmas cheer!

Swiss Samichlaus-Bag:Swiss Samichlaussäck

Peanuts in the shell (whole walnuts are also traditional, but optional)

Mandarin Oranges, apples

Individually wrapped chocolates

Homemade Christmas cookies, wrapped in clear plastic

Options:  Gingerbread men, marzipan fruits, or pralines


The traditional bag is made of burlap, though cloth or plastic will work well too.  Fill the bags, and put a note on them if you’re going to leave them at a neighbour’s door, or on a co-worker’s desk.  Enjoy the joy of giving!  And Merry Christmas!

Some bags I prepared for my husband's coworkers; the santa claus is a chocolate ornament hanging on our tree.

Some bags I prepared for my husband’s co-workers (mandarin oranges are hiding in there somewhere!); the Santa Claus is a chocolate ornament hanging on our tree.


Hand-Made Spinach & Ricotta Ravioli

This was recently made, and delicious!  I will be the first to admit that I am usually too lazy to make my own pasta – living next door to Italy means we have both dried and fresh versions in every grocery store.  Having said that, I have made this occasionally and what can I say?  Home-made is the best!  In the picture you’ll notice two colours of pasta; we substituted a bit of the spinach for some of the flour in the basic dough recipe; experiment and see how much you’ll need, and add a bit of flour to compensate for the extra moisture if needed.

Hand-Made Spinach & Ricotta Ravioli

DOUGH:

250 gr. Flour
2 eggs, beaten
2-4 Tbs. Water
1 Tbs. Oil

Mix into a smooth dough; tip out onto a floured surface and knead with your hands until it is smooth and elastic. Return to the bowl, cover and let it rest for 30-60 minutes.

Spinach & Ricotta RavioliFILLING:

300 gr. Frozen, chopped spinach
200 gr. Ricotta, diced
100 gr. Parmesan cheese, grated
1 garlic clove, pressed or finely chopped
a pinch of Nutmeg
1/4 tsp. Salt
A few grinds of pepper

Thaw the spinach, press the extra liquid from it, and chop if it’s not already chopped. Mix everything together.

To Form:

Halve the dough; set aside half. On a bit of flour, roll out the half dough into a thin rectangle (~32×46 cm), loosening it occasionally from the work surface. With a dough cutter (pizza cutter or a knife), trim the edges to straighten.
About 4 cm from the edge of the dough, about 2 finger-widths apart, spoon ~1 tsp. Across ONE row only, covering the rest of the dough with plastic to keep it from drying out.
With a bit of water on your finger, moisten a strip of dough between each filling mound and along the outer edges.
Fold the dough from the edge up and over the filling, pressing down on the outer edges and between each mound. With a dough wheel, or butter knife, cut the dough free from the rest of the dough, and slice between each ravioli, pressing together firmly if still needed.
Spread the finished ravioli on a plate to dry while you prepare the others.

To Cook:

In simmering, salted water, simmer the pasta for 5-7 minutes (avoid boiling, as it will burst the ravioli). If you want to cook all 60 ravioli at once, use a wide, deep pan. If you do it in batches, then place the cooked pasta, drizzled with a bit of melted butter, into an oven-safe pan with a lid, and keep it warm in a low-heated oven (50-100°C / 120-200°F).

Serve with your favourite pasta sauce, and grated cheese.  Serve with a robust red wine,  for example a somewhat buttery Chardonnay or a full-bodied Pinot Gris.  Fleshy, aromatic whites with a hint of fruit and oak are well suited to this dish. Thanks to The Wine Review for this tip!

Spinach Pie (Spinatwähe)


Spinach Pie, ReducedWe had this tonight, and it was very good!  I’ve translated the recipe from a Swiss recipe for “Spinatwähe”.  If you like savoury pies, you’ll like this one!

Spinach Pie (Spinatwähe)

Butter for the pie tin
1 round pie dough, 270 gr. (for 1 pie, 26-28 cm Ø)
Filling:
300 gr. (10.5 oz.) frozen, chopped spinach – thawed
2 dl. (6.5 oz.) cream
4 eggs
1 tsp. thyme
Salt & Pepper to taste
100 gr. (3.5 oz.) diced ham
Preheat the oven to 220°C (430°F)

Lay the rolled-out dough into a buttered round pie tin; purée the filling together and then pour into the pie dough and sprinkle the diced ham over the top (or stir it into the filling before pouring in, whichever you prefer).

On the lowest rack of the oven, bake at 220°C for 25-30 Minutes.


Serves 8

Baking time, ca. 30 minutes

New Book Release: Redemption, the Northing Trilogy, Book 2

Redemption CoverAnnouncing the release of my second book, Redemption!  At the moment both books are available on Kindle, and coming soon in paperback.  If you enjoy 18th century fiction a la Jane Austen or Georgette Heyer, I think you’ll love these two books!  I’ve thoroughly enjoyed writing them; before writing the third book in this series, however, I’ll be finishing two other manuscripts, in vastly different genres.  So keep your eye out for more news!

The reason for the brief interlude between the releases of The Price of Freedom and Redemption is that the second was nearly complete when I released the first one; POF had been done for a few months by the time I actually had time to sit down and go through the publication process for the first time properly; don’t think either book was rushed, as I’m meticulous with the nuts and bolts, and I would like to think quality, though that is up to the reader to assess, not me!

To read a snippet of the book and find out more, please check out my “Publications” page, and let me know what you think – I’d love to hear from you!

Chilled Melon Soup

Add a sprig of mint to give it that "slaved all day in the kitchen" look...

Add a sprig of mint to give it that “slaved all day in the kitchen” look…

Fruit soups are very popular in northern Europe & are frequently served as dessert as well as during the main meal.  The spices give this soup a Middle Eastern flare, and it’s perfect for a hot summer lunch or dinner!

Chilled Melon Soup

1 – 2 ripe melons such as cantaloupe (muskmelon) or honeydew

2 C. milk or half – and – half

3 Tbs (45 ml) chopped fresh mint leaves, plus additional for garnish

½ tsp. (2 ml) ground coriander

4 – 6 Tbs (60 – 90 ml) plain yogurt

Peel & seed the melons. Scoop out some melon balls with a melon baller & reserve for garnish. Coarsely chop the remaining melon to make 2 to 3 C. (500 – 750 ml) of chopped meloAdd a sprig of mint to give it that “slaved all day in the kitchen” look…Add a sprig of mint to give it that “slaved all day in the kitchen” look…n. Puree the chopped melon, milk, mint leaves, & coriander in an electric blender or food processor. Strain & serve chilled, garnished with a dollop of yogurt, additional mint leaves, & the reserved melon balls.